Roasting Pigs Cooking Techniques
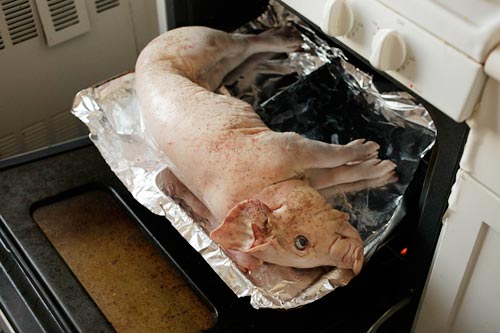
Convection Oven
For pigs 20-30 lbs, place on a baking sheet in 275°F oven for a minimum of four hours until hams and shoulders reach 170°F.
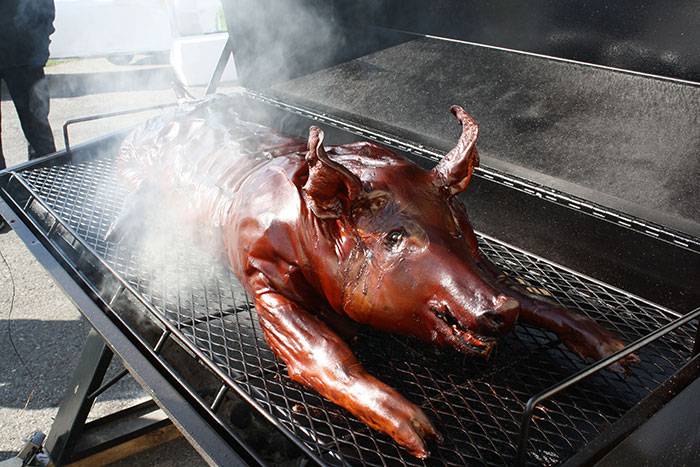
Smoker
Smoke pigs less than 90 lbs for 5-6 hours and larger pigs for 12-14 hours. When hams and shoulders reach 170°F, the pig is done.
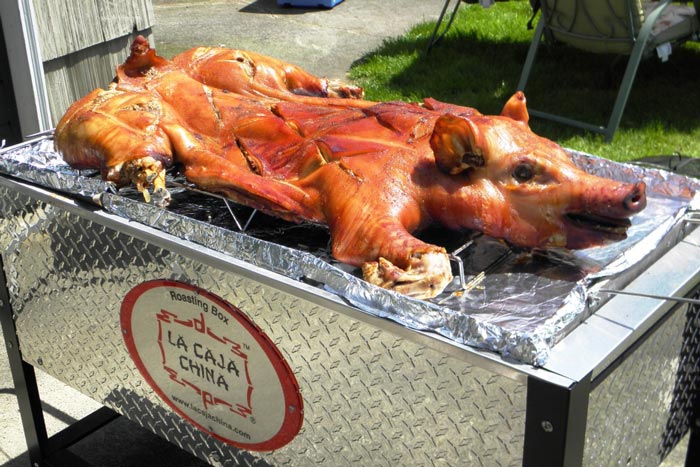
La Caja China Box
An efficient roasting application that cooks pigs 20-100 lbs in 5-6 hours. Place butterflied pig between 2 racks. Drop into La Caja China Box and cover with metal pan and light coals on top.

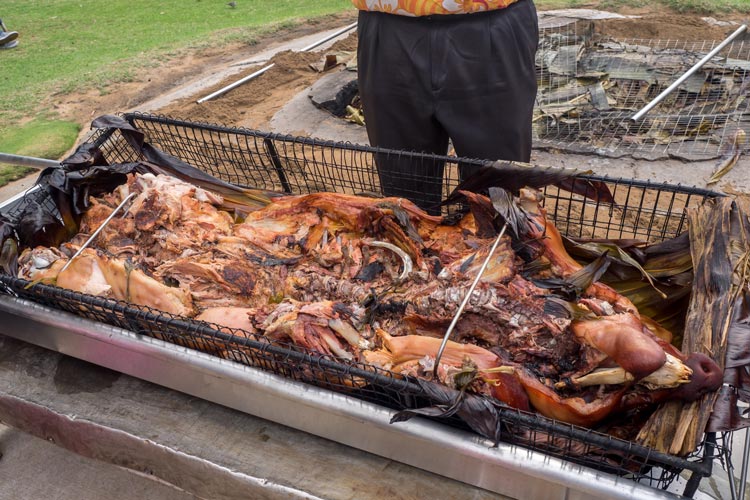
Underground Pit Roast (Kalua)
Kalua roasting is cooking the pork in an underground pit that uses hot rocks to generate the heat.
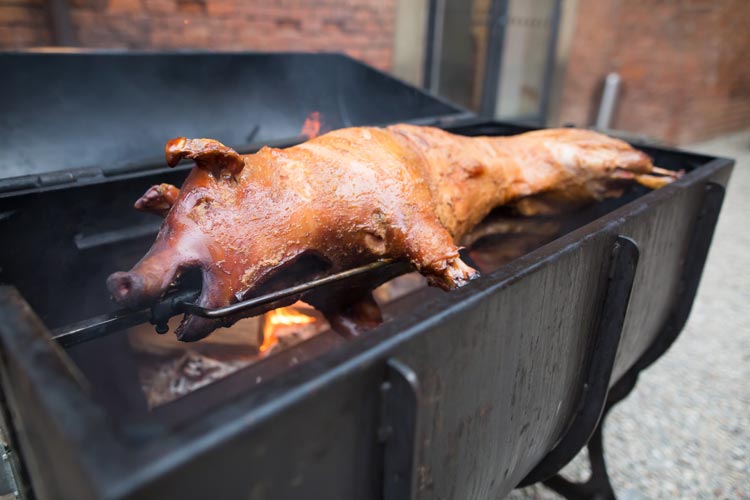
Spit
Equipment and Ingredients
The Spit. Unless you are lucky enough to own one, you can find a local rental store that has them.
You’ll Need:
- Charcoal briquettes. One pound of coals per pound of pig. It is a good idea to have an extra 25 pounds or so on hand.
- A chimney starter.
- A long set of tongs for arranging the coals underneath the pig during cooking.
Kosher salt is the only seasoning you really need. Rub the salt generously on the pig inside and out.
Time. Cooking time is approximately an hour and 15 minutes per 10 pounds.
Prep The Pig
- Secure the pig to the spit. Dead pigs are heavy, and need to be well secured so they don’t flop around as the spit at it turns. Make sure you strap the spine to the spit to ensure your pig stays secure.
- Once you get the coals under the pig and the pig turning (most spits have an electric motor to rotate the pig automatically), you can sit back and relax, tending to it only once every half hour or so to ensure that the coals are still hot and the pig is not over or undercooking.
- If your pig takes on a burnished color in the first hour, you’re cooking too fast. Slow down the rate at which you are adding coals, or raise the pig a few inches from the heat source.
- The last half hour is where all the skin-crisping crackly magic happens, and requires high heat, so you’ll want to pile on the coals at the very end, rotating the pig as necessary to expose every inch of skin to the intense blast of heat. If all goes well, it’ll bubble into blistery pustules that crackle and dissolve in your mouth.
Aboveground Pit Roast
Prep the Pit:
Start the process at least one day before the roast.
- 30 cinderblocks
- foil
- a shovel
- a level
- a sheet of expanded metal or metal grate about 36 by 54 inches— Do not use galvanized metal. It releases fumes that will make you sick.
- Optional: about 10 heat resistant bricks
Instructions:
- The best option is to get one custom made from shops that make oil drum barbeques. It is much cheaper but you can design the grate as you want. Since you can reuse it the effort to find a place that can do this is worthwhile.
- Clear a patch of land about 4 feet by 6 feet.
- Start by forming a rectangle of cinderblocks. Use 2 cinder blocks by 3 cinder blocks. Lay this first row on the sides so air can run through this bottom layer. Use a level to make sure this row is even. Use heat resistant bricks to line the inside of the length of the bottom row so there will not be too much oxygen in the pit or simply seal up the holes using foil.
- Stack the rest of the rows on top of the barbeque with the solid sides facing out. Line the bottom of the barbeque with tin foil.
Prep The Pig:
Start this early in the morning the day of the roast.
- 1 50-pound pig, gutted and cleaned
- Kosher salt
- a box cutter
- latex gloves
- Ice and cooler
Instructions:
- Splay out flat over the grill. To do this you will need a hammer and a small ax.
- Rinse the pig off very well and place on a large clean surface.
- Carefully score the surface of the pig with a box cutter in large criss-crossing diagonals. Don’t cut past the skin and layer of fat into the flesh.
- With heaping handfuls of kosher salt, rub generous amounts all over the pig. Don’t be concerned about over salting it; it is a lot of meat.
- Place the pig in a cooler with bags of ice (do not remove the ice from the bag) over it to rest overnight.
Starting The Grill:
Start this process the day before the roast.
- 60 pounds of charcoal
- 1 coal chimney
- a small rake or shovel
- BBQ tongs
- meat thermometer
- 6-8 sheet pans or a large sheet of metal
- *Optional: meat syringe, BBQ mop, more heat resistant bricks
Instructions:
- Start with one 20-pound bag of charcoal. Spread into two even piles on each end of the barbecue. Light and let it burn down until the coals are ashy and glowing.
- Lower the grate so it is resting on top of the second layer of cinder blocks about 16 to 18 inches from the ground.
- Layer the third row of cinder blocks on top of the grate. This provides a short wall around the pig so a sheet of metal can be placed over the pig while it cooks, trapping in the heat.
- While you wait for the coals to burn down, get the pig out of the chest and pat dry. At this point you can inject with fresh pineapple juice (which has enzymes that helps break down protein), Seville orange juice, chillies, garlic, oregano, cumin and salt. You can have a bowl of this on the side and occasionally basted the pig.
- When the coals are ready, place the pig on the grate belly-side down and stick the thermometer in thickest part of the thigh. Cover with sheet of metal or carefully arrange a layer of sheet pans on the top of the pit.
- Reserve a few coals to start a full chimney (about 5 pounds) so that they’re ready to add to the pit when needed. Keep the temperature between 225 and 250 degrees.
- When new coals are needed just remove a couple of the corner cinder blocks and use a shovel and/or BBQ tongs to add to the pile. When the ash starts to build up push it carefully towards the center so that you’re not putting new coals over a pile of ash. Do this gently so ash doesn’t fly up all over the pig.
- When the inside had gotten some good color on it (approx. and hour) flipped the pig on to its back and let it roast for another 2 hours then flip back to the stomach side again.
- Bast a few times with the extra juice. Cook until the internal temperature of the meat hits about 200.
Kalau - Underground Pit
Kalua roasting is cooking the pork in an underground pit that uses hot rocks to generate the heat.
What you need:
- Fire Brick or River Rock—100 weighing around 5 pounds each
- New Shovel
- Pole approx. 3” in diameter and 5 to 6 feet long
- Wire
- Kindling and Firewood
- Burlap—Enough to cover entire carcass and a little left over
- Green Corn Leaves and Husks
- Chicken Wire—Enough to envelope whole carcass
- Canvas—Larger than the size of the pit opening
- Kerosene or Charcoal Lighter
- Matches or Lighter
- Heavy Oven Mitts
Prepare River Rock:
- Two weeks before cooking set the rocks out in the sun.
- One week before preheat the rocks by placing them in a very hot open fire for 3-4 hours. Let cool and then store in a dry place.
- Dig a hole 3 feet deep, 4’ across and the length for your sized pig.
- Line pit with fire brick (can be purchased at a fireplace store)
- Wrap a wad of burlap around one end of the pole securing it with wire. Place the pole in the center of the pit so the burlap-wrapped end rests on the bottom of the brick-lined pit.
- Stack kindling in bottom of pit around pole.
- Place the lava or preheated rocks on top of the wood.
- 2-4 hours before pig goes into the pit, pull out the pole and dip the burlap into kerosene or charcoal lighter fluid. DO NOT USE GASOLINE! Light the burlap and insert pole back into hole.
- Let fire burn down. Fire is ready when coals are glowing and the rocks are red hot.
Prepare the Pig:
It will take approximately 5 hours to cook a 100 pound pig.
- Rub a generous amount of rock salt into the cavity of the pig.
- Wearing heavy oven mitts, use a new shovel that has been scalded to fill the carcass with some hot rocks from the pit.
- Tie hind legs securely to front legs.
- Line a large section of chicken wire with corn husks (or aluminum foil) and enclose the entire pig.
- Remove any wood fragments from pit and spread the hot rocks out in the bottom.
- Cover with green corn leaves and husks.
- Lay prepared pig on the leaves.
- Cover pig with more thick layers of husks.
- Lay moistened lengths of burlap over the second layer of husks. Make sure that there is no steam escaping and then cover with dirt.